Setup Nextcloud instance
Move to Nextcloud - Setup
Project Link: Nextcloud
Setup
Let's start with the Setup. I assume you have SSH access to dedicated host where you want to install your Nextcloud instance. As i am working with Ubuntu 20.04 all commands will suit for Ubuntu / Ubuntu based OS.
needed packages
# lets update our OS
sudo apt update &&
sudo apt upgrade

# Optional: clean up and remove old packages which were not needed anymore
sudo apt autoclean &&
sudo apt autoremove
# Install the web server + PHP and its needed php extensions
sudo apt install software-properties-common -y
sudo add-apt-repository ppa:ondrej/php
# Press [ENTER] to continue
sudo apt install apache2 php8.0 php8.0-curl php8.0-gd php8.0-xml php8.0-mbstring php8.0-zip php8.0-mysql php8.0-bz2 php8.0-intl php8.0-smbclient php8.0-bcmath php8.0-gmp php8.0-redis php8.0-imagick ffmpeg libmagickcore-6.q16-6-extra mysql-server redis
The package libmagickcore-6.q16-6-extra is needed for the SVG support for imagick. If not installed, you will receive a warning by Nextcloud after installation.
MySQL database configuration
# Secure the newly installed mysql-server
sudo mysql_secure_installation

# Follow the on-screen instaruction, set a root password,
# remove the anonymous users,
# disallow root login remotely,
# remove test database and
# reload privilege tables
After securing the installation access the MySQL DBMS and create the dedicated user and database for your Nextcloud instance.
sudo mysql
mysql> create user 'nextcloud_user'@'localhost' identified by 'SecretPassword';
mysql> create database if not exists nextcloud_db character set utf8mb4 collate utf8mb4_general_ci;
mysql> grant all privileges on nextcloud_db.* to 'nextcloud_user'@'localhost';
mysql> flush privileges;
mysql> select User, Host from mysql.user;
+------------------+-----------+
| User             | Host      |
+------------------+-----------+
| debian-sys-maint | localhost |
| mysql.infoschema | localhost |
| mysql.session    | localhost |
| mysql.sys        | localhost |
| nextcloud_user   | localhost | # <-- our newly created user
| root             | localhost |
+------------------+-----------+
6 rows in set (0,00 sec)

mysql> show databases;
+--------------------+
| Database           |
+--------------------+
| information_schema |
| mysql              |
| nextcloud_db       | # <-- our newly created database
| performance_schema |
| sys                |
+--------------------+
5 rows in set (0,01 sec)

mysql> exit
Bye
download Nextcloud files and extract it
Please have a look at the Nextcloud Release Page for the latest stable version. In our case version 23.0. Download the .tar.bz2 package via wget to your host and extract it.
wget https://download.nextcloud.com/server/releases/nextcloud-23.0.0.tar.bz2
wget https://download.nextcloud.com/server/releases/nextcloud-23.0.0.tar.bz2.sha256
sha256sum --check nextcloud-23.0.0.tar.bz2.sha256
# Should  say something like "nextcloud-23.0.0.tar.bz2: OK" if the downloaded file is ok
tar -xvf nextcloud-23.0.0.tar.bz2 # <-- extract the files
web server configuration
Move the extracted files to the web root, in our case /var/www/htm/, and configure the Apache web server.
sudo mv nextcloud /var/www/html/nextcloud
sudo chown www-data:www-data -R /var/www/html/nextcloud/
sudo a2enmod rewrite
sudo a2enmod headers
sudo a2enmod env
sudo a2enmod dir
sudo a2enmod mime
Now create the file /etc/apache2/sites-available/nextcloud.conf and enter the following.
ServerName YourHostName
Alias / "/var/www/html/nextcloud/"
DocumentRoot "/var/www/html/nextcloud/"

<Directory /var/www/html/nextcloud/>
  Require all granted
  AllowOverride All
  Options FollowSymLinks MultiViews

  <IfModule mod_dav.c>
    Dav off
  </IfModule>
</Directory>
ErrorLog /var/log/apache2/nextcloud.info-error_log
CustomLog /var/log/apache2/nextcloud.info-access_log common

<IfModule mod_headers.c>
    Header always add Strict-Transport-Security "max-age=31536000 ; includeSubDomains; preload"
</IfModule>
Hint: Nextcloud recommends a minimum max age of 15768000 seconds for the security header, but regarding to HSTSPreload.org and Qualys SSL Labs it better to use at minimum 31536000 (a year in seconds).
Save the file and restart web server and MySQL.
Enable web server and MySQL to restart automatically after reboot
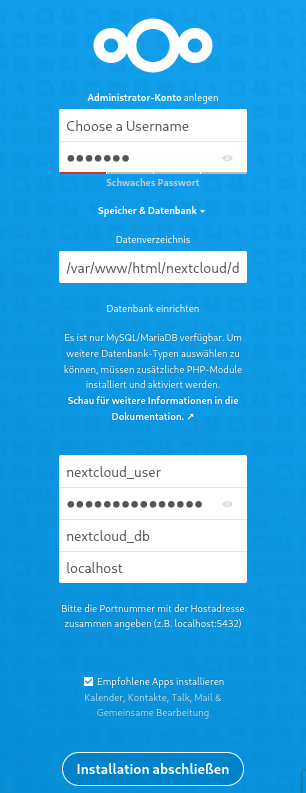
Complete the Setup
Choose your favorite Browser and navigate to http://YourHostName and complete your Nextcloud installation.
Username: Choose your Username
Password: Choose your Password
Databaseuser: use the Username we created above, in this case nextcloud_user
Databaseuser Password: type the password for the user we created above
Databasename: use the name of the database we created above, in this case nextcloud_db
If entered everything, click the button below.